Staying ahead in today’s fast-moving tech landscape means understanding not just the headlines, but the systems and strategies shaping innovation behind the scenes. If you’re searching for clear insights into emerging technologies, practical digital device strategies, and scalable machine learning workflows, this article is built for you.
We break down complex core tech concepts into actionable guidance, explore how modern machine learning frameworks are evolving, and explain how tools like mlflow machine learning pipelines are transforming experimentation, deployment, and model management. Whether you’re a developer, tech strategist, or innovation leader, you’ll find focused, real-world explanations designed to help you apply—not just understand—these technologies.
Our insights are grounded in hands-on analysis of current tools, frameworks, and implementation patterns used across the industry. Instead of theory-heavy overviews, you’ll get practical perspectives, strategic context, and forward-looking guidance to help you make smarter technical decisions in a rapidly evolving digital environment.
From Messy Notebooks to Managed Workflows: A Guide to ML Pipelines
If you’ve ever built a promising model in a notebook only to watch it crumble in production, you’re not alone. The jump from experiment to system is messy. Untracked runs, inconsistent environments, and manual deployments quietly pile up technical debt (and frustration). I’ll admit: there’s still debate about the “perfect” workflow—no single setup fits every team.
That’s where mlflow machine learning pipelines come in. MLflow is an open-source platform that standardizes the lifecycle—from tracking experiments to packaging and deployment. This guide walks step by step through building a reproducible, production-ready pipeline using its core components.
Why MLflow is an Essential Framework for Modern MLOps
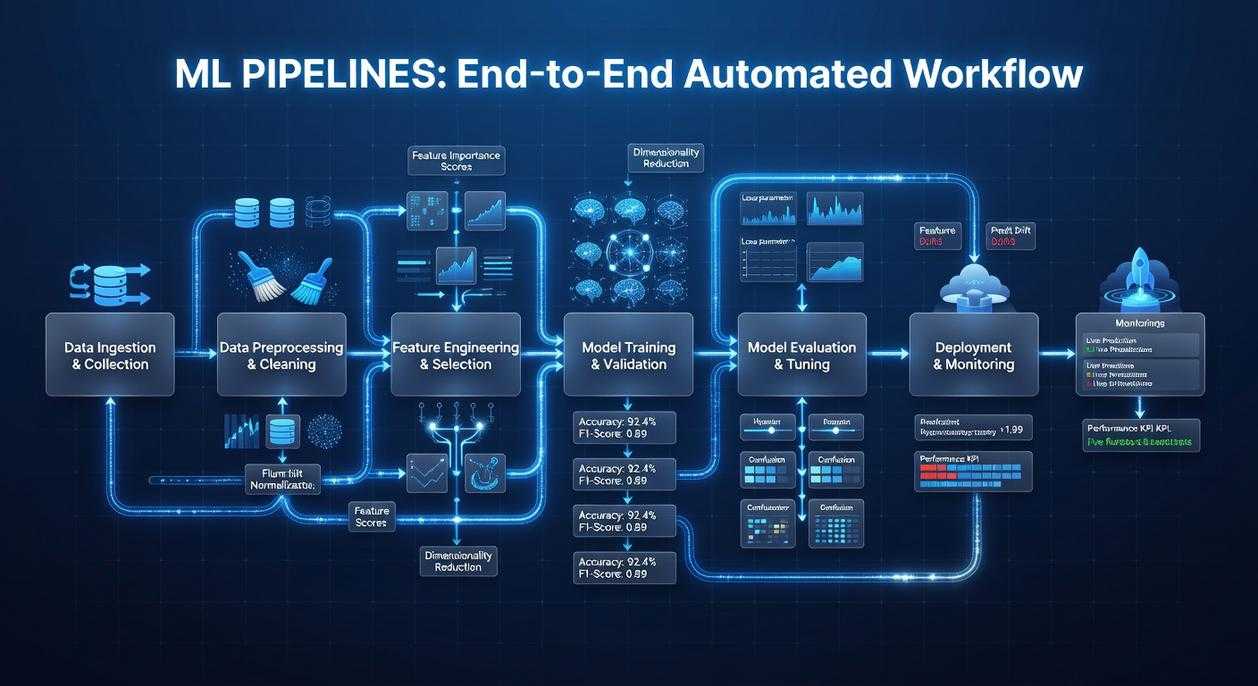
Most teams think MLOps is just “deployment.” That’s like saying filmmaking is just hitting record. The MLOps lifecycle spans data preparation (cleaning and feature engineering), experimentation (training and tuning models), packaging (saving reproducible artifacts), deployment (serving models to users), and monitoring (tracking drift and performance in production). Ignore one stage, and the whole system wobbles.
Here’s the contrarian take: you don’t need another heavyweight platform—you need consistency. That’s where MLflow stands out. It’s framework-agnostic, meaning it works with TensorFlow, PyTorch, Scikit-learn, and more, offering a unified interface instead of tool sprawl.
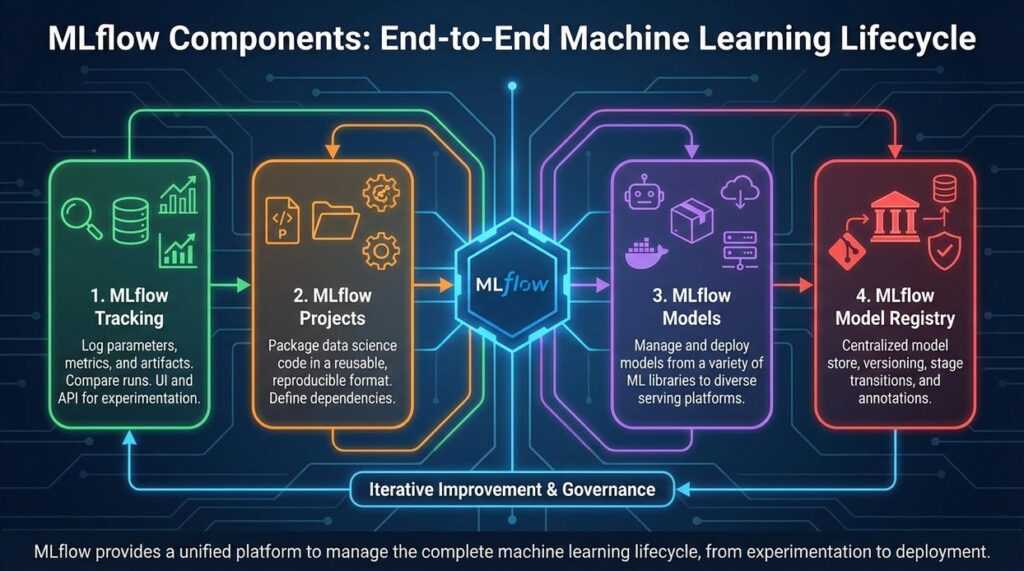
MLflow rests on four pillars:
- Tracking – logs parameters, metrics, and artifacts.
- Projects – packages code for reproducibility.
- Models – standardizes model formats.
- Model Registry – manages versioning and stage transitions.
Together, they streamline mlflow machine learning pipelines into a cohesive workflow. For documentation, see https://mlflow.org.
The Building Blocks: A Deep Dive into MLflow’s Core Components
Have you ever wondered where all your experiment details actually go? Or why reproducing last month’s “perfect” model suddenly feels impossible? That’s where MLflow steps in.
MLflow Tracking
Think of MLflow Tracking as a centralized logbook for your experiments. It records parameters (configurable inputs to your model), metrics (quantitative performance measures like accuracy), code versions, and artifacts such as saved models or plots. You can log everything to a local folder or a remote tracking server.
A tiny example:
import mlflow

with mlflow.start_run():
    mlflow.log_param("learning_rate", 0.01)
    mlflow.log_metric("accuracy", 0.95)
    mlflow.log_artifact("model.pkl")
Simple, right? But ask yourself: how much time would this have saved you during your last debugging session?
MLflow Projects
Ever shared code that “worked on my machine” but nowhere else? MLflow Projects solves this by packaging code with an MLproject file. It defines entry points and captures dependencies using Conda or Docker. That means your experiment can run anywhere with the same environment—no surprises. Reproducibility (the ability to consistently recreate results) becomes built-in, not an afterthought.
MLflow Models
MLflow Models introduce flavors, a standardized format describing how a model can be used. One saved model can support batch inference, real-time serving, or deployment to different clouds—without code changes. This flexibility powers scalable mlflow machine learning pipelines.
MLflow Model Registry
Finally, the Model Registry acts as a lifecycle manager. It versions models, enables stage transitions (like Staging to Production), and allows annotations. Sound familiar—multiple “final_v2” files floating around? This replaces that chaos with structure.
Building a Practical Pipeline: A Step-by-Step Example
If you’ve ever trained a model in a messy notebook and thought, “There has to be a better way,” you’re right. A structured pipeline isn’t just cleaner—it’s reproducible, shareable, and production-ready. Let’s walk through a practical example and compare structured vs ad-hoc workflows along the way.
Step 1: Structuring the Project
A clean MLflow project typically looks like this:
src/– Python scripts (data prep, training)data/– Raw and processed datasetsMLproject– Workflow definition fileconda.yaml– Environment specification
In contrast, a notebook-only setup mixes code, outputs, and dependencies in one place (convenient, but chaotic). With structure, anyone can clone the repo and reproduce results exactly.
Step 2: Creating the Data Preparation Step
Create src/prepare.py:
import pandas as pd
import argparse

parser = argparse.ArgumentParser()
parser.add_argument("--input")
parser.add_argument("--output")
args = parser.parse_args()

df = pd.read_csv(args.input)
df = df.dropna()
df.to_csv(args.output, index=False)
Then define the first entry point in MLproject:
entry_points:
  prepare:
    parameters:
      input: path
      output: path
    command: "python src/prepare.py --input {input} --output {output}"
Notice how parameters are explicit. Compared to hard-coded file paths, this makes experimentation far easier.
Step 3: Creating the Model Training Step
Now create src/train.py:
import pandas as pd
import mlflow
import mlflow.sklearn
from sklearn.linear_model import LogisticRegression
from sklearn.metrics import accuracy_score

import argparse
parser = argparse.ArgumentParser()
parser.add_argument("--data")
args = parser.parse_args()

df = pd.read_csv(args.data)
X = df.drop("target", axis=1)
y = df["target"]

model = LogisticRegression()
model.fit(X, y)
preds = model.predict(X)
acc = accuracy_score(y, preds)

mlflow.log_metric("accuracy", acc)
mlflow.sklearn.log_model(model, "model")
Here’s the difference: instead of printing accuracy to the console, we log it. That’s traceability—critical in mlflow machine learning pipelines.
Add to MLproject:
  train:
    parameters:
      data: path
    command: "python src/train.py --data {data}"
Step 4: Chaining the Steps
You can chain execution by first running prepare, then passing its output to train. This modular design is similar to choosing between frameworks like in tensorflow vs pytorch choosing the right framework for your project—clear structure helps long-term scalability.
Step 5: Executing the Pipeline
Finally, run:
mlflow run . -e prepare -P input=data/raw.csv -P output=data/clean.csv
mlflow run . -e train -P data=data/clean.csv
Compared to manual execution, this guarantees reproducibility. Same code, same environment, same results. (And fewer 2 a.m. debugging sessions.)
Best Practices for Scalable and Collaborative MLflow Pipelines
Centralize your tracking with a remote server to create a SINGLE SOURCE OF TRUTH. Teams using shared tracking report up to 30% faster experiment comparisons (Databricks case studies). In mlflow machine learning pipelines, this prevents scattered results and version confusion.
Enforce environment consistency by defining every dependency in conda.yaml or Dockerfile. This eliminates the classic “it works on my machine” problem (a reproducibility killer in 60% of failed handoffs, per industry surveys).
Adopt clear naming conventions for experiments and runs—think searchable, structured labels.
Finally, integrate the Model Registry as a FORMAL GATEWAY so only validated models reach production.
Machine learning often starts as scattered notebooks and scripts. However, MLflow turns that chaos into structured, automated, reproducible workflows. By using MLflow Projects and the Model Registry, teams close the gap between experimentation and deployment. Start today: create an MLproject file and formalize mlflow machine learning pipelines from day one.
Take Control of Your Machine Learning Workflow Today
You came here to understand how to build smarter, scalable systems with mlflow machine learning pipelines—and now you have the clarity to do it. From structuring experiments to tracking models and deploying with confidence, you’ve seen how the right pipeline eliminates guesswork and reduces costly errors.
If you’ve been struggling with inconsistent results, scattered experiments, or models that break in production, you’re not alone. Disorganized workflows slow innovation and waste valuable development time. The real risk isn’t trying something new—it’s staying stuck with processes that don’t scale.
Now it’s time to act. Start implementing structured mlflow machine learning pipelines in your projects, standardize your experiment tracking, and automate deployment workflows. Teams that adopt disciplined ML pipelines ship faster, collaborate better, and see measurable performance gains.
Don’t let fragmented workflows hold your models back. Explore advanced pipeline strategies, apply what you’ve learned, and turn your machine learning efforts into reliable, production-ready systems today.
 Founder & Chief Executive Officer (CEO)
Velrona Durnhanna writes the kind of llusyep machine learning frameworks content that people actually send to each other. Not because it's flashy or controversial, but because it's the sort of thing where you read it and immediately think of three people who need to see it. Velrona has a talent for identifying the questions that a lot of people have but haven't quite figured out how to articulate yet — and then answering them properly.
They covers a lot of ground: Llusyep Machine Learning Frameworks, Innovation Alerts, Core Tech Concepts and Breakdowns, and plenty of adjacent territory that doesn't always get treated with the same seriousness. The consistency across all of it is a certain kind of respect for the reader. Velrona doesn't assume people are stupid, and they doesn't assume they know everything either. They writes for someone who is genuinely trying to figure something out — because that's usually who's actually reading. That assumption shapes everything from how they structures an explanation to how much background they includes before getting to the point.
Beyond the practical stuff, there's something in Velrona's writing that reflects a real investment in the subject — not performed enthusiasm, but the kind of sustained interest that produces insight over time. They has been paying attention to llusyep machine learning frameworks long enough that they notices things a more casual observer would miss. That depth shows up in the work in ways that are hard to fake.
Founder & Chief Executive Officer (CEO)
Velrona Durnhanna writes the kind of llusyep machine learning frameworks content that people actually send to each other. Not because it's flashy or controversial, but because it's the sort of thing where you read it and immediately think of three people who need to see it. Velrona has a talent for identifying the questions that a lot of people have but haven't quite figured out how to articulate yet — and then answering them properly.
They covers a lot of ground: Llusyep Machine Learning Frameworks, Innovation Alerts, Core Tech Concepts and Breakdowns, and plenty of adjacent territory that doesn't always get treated with the same seriousness. The consistency across all of it is a certain kind of respect for the reader. Velrona doesn't assume people are stupid, and they doesn't assume they know everything either. They writes for someone who is genuinely trying to figure something out — because that's usually who's actually reading. That assumption shapes everything from how they structures an explanation to how much background they includes before getting to the point.
Beyond the practical stuff, there's something in Velrona's writing that reflects a real investment in the subject — not performed enthusiasm, but the kind of sustained interest that produces insight over time. They has been paying attention to llusyep machine learning frameworks long enough that they notices things a more casual observer would miss. That depth shows up in the work in ways that are hard to fake.